Article
A Pinhole for your DSLR
Please read the article on
pinhole cameras
 if you have not already done so, even if you think you know all there is to
know about pinhole cameras.
if you have not already done so, even if you think you know all there is to
know about pinhole cameras.
You may also like to look at the 5 minute
project
Pringle tube pinhole
camera.
Most modern DSLR's
can be used as pinhole cameras and in this and two further short
articles, I am going to look at:-
-
How to do this, including instructions.
-
Look at the factors that allow you to
get better pinhole photographs.
-
How to get a zoom/wide angle effect.
-
How to simulate the rising front on a
camera to allow taller buildings to be photographed without them leaning
backwards.
Pinhole photography is useful in helping
you to understand photography better, as well as a fun or interesting thing
to do. It does not produce the quality of image that you would routinely
wish to use today, however there may be occasions where you feel it would be
the solution, where you don't have the lens with you that you need.
|

 Image taken as a part of this
experiment using a Nikon DSLR, no lens but a pinhole in foil, on
card instead.
Image taken as a part of this
experiment using a Nikon DSLR, no lens but a pinhole in foil, on
card instead.
ISO 640, 2 seconds, pinhole in foil, on
card over tubes. |
To be able to make pinhole images, we just
need to turn the camera to manual, so we can control the
Shutter
Speed,
and
so that the camera does not object to having a lens missing to meter with.
We can then remove the lens and replace it
with something that blocks the light from entering and allows a pinhole to
be positioned. The most common way of doing this is to use a camera body
cap, drill a hole in it and put on the front, over the hole, something very
thin that can have a pinhole in. A flattened out section of a thin aluminium
can such as those used to provide drinks, is often used.
For the experiments here, instead of the body
cap I have used a set of tubes, that are usually used for
Macro Photography.
This has a telephoto affect compared to the body cap, which gives the widest
angle that you can get.

Tubes, shown above, have no lens/glass in them,
they are just spacers. They normally come in sets allowing you, from a set of
3, to have 7 combinations of thickness. You could equally use any other
attachments you happen to have such as an adaptor for a scope or microscope.
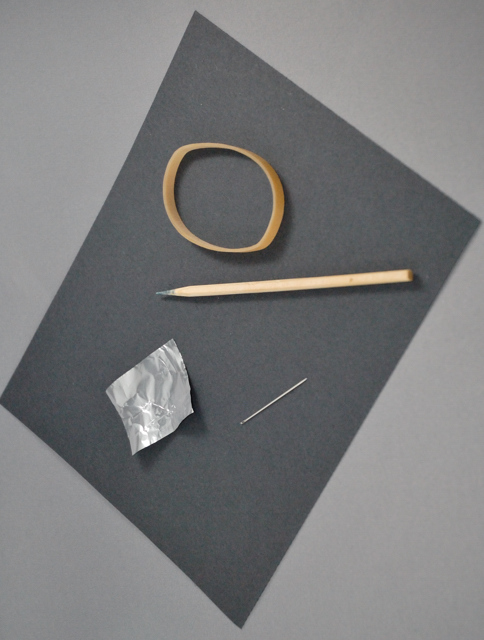
To do this
we need:-
-
camera
-
tripod
-
cable release (although I could have
used the self timer)
-
a set of tubes
-
black card, thick enough that light can't
go through it
-
kitchen silver foil, small piece, could
instead be a piece of a chocolate bar wrapper
-
small needle or pin
-
something to make a larger hole, I have
used a piece of pointed wood that corn on the cobs are provided on at a KFC
-
elastic band or two
-
cellotape
Most of the items are shown in the
image on the
right
|
 |
What to do
-
Cut
a circle of black card, a little larger than the tubes, and cut inwards
to just short of the tube diameter so that the edges can be easily
folded in.
-
Use
the pin or needle to put a hole in the centre of the card, then the
larger device to make a larger hole.
-
Cellotape
at ends, the silver foil onto the outside of the card.
-
From
the inside, pin prick the smallest hole you can in the foil that you can
see through the hole, as near to the centre of the hole as you can. Hold
it up to the light and check that you have only one very small pin
prick. (See image below at this stage).
-
Put
the card now over the tubes, with the silver foil on the outside, and
use the elastic band to hold it in place.
-
Take
off your camera lens, and put on the
tube set.
-
Turn
the camera to manual.
-
Set
the
ISO
at 400 and the shutter speed to 5 seconds.
-
Put the camera on the tripod
and point it
in the direction you want to take a photo

The piece of card with
foil under, showing the pin or needle prick in the centre of
the foil
showing through the card, shown larger than real size.
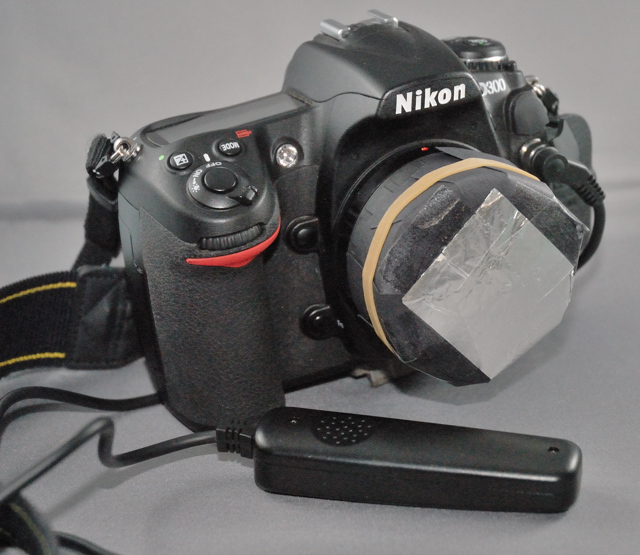
Camera with no lens, but a
pinhole in foil, on card over a tube. Exposures can be
setoff with the self timer or by using a
Remote cable
(shown) or radio remote.
| Taking the photos with this setup
Ignore the
exposure meter.
Take a photo, adjust your position or
Shutter
Speed,
to capture the subject better. You can see the curve to get a good
idea of how much to adjust the exposure by. Make the shutter speed longer
i.e.
20 seconds to make it lighter, shorter i.e. 1 second to make it darker, to
start use halving or doubling (1 stop) or more, between steps to get
approximate, then use finer adjustments if necessary.
If it does not work, then usually this is
because something is blocking the light, it could be a piece of the card
from the hole you punched or perhaps the foil/card is not laying
flat enough. If you have a flip
up and down piece with the foil, on card then you would be able to
get a liveview image of the pinhole effect from the larger hole in the
card to line the camera up, but as the picture quality would be poor,
you can put back a smaller pinhole to capture the image. |

Image taken with a D300 as
part of this experiment
2 seconds ISO 200, pinhole and two
smaller tube elements.
As you can see it's an image, but not
as sharp as you would get with your camera with a quality lens
attached. |
Improving the Image
It does not help that we also included
pictures taken on a D200 with a Nikon lens on this page showing the
parts and D300 set up, if you had just pinhole images alone, they
would not look quite as un-sharp, they are about the same level of
sharpness as you get from a cheap camera with a plastic lens, that many
are quite happy to use.
We could however improve on these, with
time and more experimentation, but here we have stopped at what you can
achieve very quickly.
In theory the smaller the
Aperture
or
f stop the clearer your image should be up to a degree, f stops are the hole size
divided by the distance from the pinhole to the focal plane of the
camera. With
Pinhole
Photography
 measuring the distance is easy,
measuring the hole isn't. But generally images are improved by having a
smaller pinhole. Images using the tubes should be better than those
that can be produced with a body cap alone, although the body cap could
be used instead of the card on the tubes as it has the same function. measuring the distance is easy,
measuring the hole isn't. But generally images are improved by having a
smaller pinhole. Images using the tubes should be better than those
that can be produced with a body cap alone, although the body cap could
be used instead of the card on the tubes as it has the same function.
The other factor is the thickness of the
material you have the pinhole in, as the walls of this cause a varying
of the light towards the edge of the images. This is why we have used
the foil instead of just putting a pin prick in the black card. Some
people prefer a piece of aluminium can and sandpaper this down so that its
very thin. We didn't here as we wanted to produce an experiment
that anyone could do very easily. The subject needs to
be well lit, preferably with the light from behind the camera position.
You maybe able to adjust some settings on
the camera, for example on recent Nikon cameras you can use the picture
control, and increase contrast, sharpness and saturation a little. You
will also find the colours are better if you set the
white balance
for
the correct lighting conditions i.e. sunny, shade etc.
Try a number of versions of the above, you
will find every pin prick that you do differs in size, and therefore the
exposure
and image quality also varies. Try to touch lightly so that
only the tip touches and the hole is the tip rather than the shaft size.
If you use a complete piece of silver
foil instead of the card, you will find there is too much bounced or
reflected light and the image is damaged.
Its tempting to turn the
ISO
up high to
cut the exposure times but this creates noise even at ISO values that
normally in your photography does not show noise.
Many of the experiments I do are out of a
window and like all window shots the image quality is reduced.
You can machine a brass or other shim far
thinner and make up a slide for this, complete with black blocking
pieces, but here I have tried to keep the instructions simple enough that
just about anyone can do it with very little in the form of special
equipment.
Commercially produced pinholes
There are a number of people producing
pinholes that you can use with your camera, we have some contacts and
details of what they offer at the end of
Pinhole cameras
- further information.
We also have as an example a gallery of images that we have taken using
ones of these adaptors, see
Stanton Drew Stone Circle - Pinhole
Gallery
 to
see what can be achieved outside. to
see what can be achieved outside.
See Also: Two further articles expand the coverage here
using the same techniques:-
Using a pinhole to Get a zoom/wide
angle effect
Using a pinhole to simulate
the rising front on a camera
In addition we have the following articles that may also be of interest:-
Experimental photography
Pinhole
cameras
Pringle tube pinhole camera
Pinhole cameras
- further information
Pinhole
Photography Section
|