Home Newsletter Locations Diary

 Indexes

Portal
Magazine4U
Garden Section Introduction Garden Index
Further Info England Scotland Wales
      

Article

Garden Photography Techniques

We have already looked at the skills required  to successful garden photography, here we are going to take a look at the techniques of doing some of these tasks. Techniques and skills are similar and perhaps some of what we have below could have been included within the skills page.

To master the skills of garden photography it is necessary sometimes to employ techniques and come up with useful tools to allow you to get that image you want. For instance:

Black and White Photos

Most gardens are colourful, sensory places and the majority of us would first think to take colour photographs of what we see before us, but it is possible to get the same depth and texture of the garden, plant or feature with a black and white photograph if you know how. To get depth in a colour photo we use shadows to outline curves and undulations, these still work with black and white. To get the effect of the colour we have to rely on Contrast and changing the tones to add that drama and this can be done using filters. Now these Filters can be separate to the lens and screwed on and off when needed, or in some digital cameras the Black and White modes come with different colour filters built in to add to the image when capturing it on the sensor. The effect of filters is to lighten the equivalent colour and darken the opposite. So for example if you had a Red Rose on a Green background no filter would produce a grey image and it would not be seen, but adding a green filter will make the green colours lighter and the red darker so the head of the rose would have the most impact. For more on filters for digital cameras see here.

See Larger Image A Featured Garden in Scotland

Garden Vistas or Panoramas

Wide angle vistas of gardens can be achieved using wide angle lenses or even some fisheye lenses. However to capture the whole of a very large garden it may be necessary to look at doing a panorama. There are specialist panorama cameras where you can take the image in one shot, but for most of us with digital SLR cameras the option is to take a series of images and then stitch them together in editing afterwards. There are a number of things you need to watch out for with this.

See Larger Image A Formal Garden in the Cotswolds

To do a good panorama you need:

  • to use a tripod so that the horizontal angle is the same on each image

  • use either a panorama head or a macro focusing rack, like the Novaflex Castel-Mini, so as to set the nodal point (the point the tripod rotates at under the aperture ring of the lens)

  • overlap the images by about a third to allow for more accurate line up in editing

  • use the camera in manual mode so that you can lock the Exposure and white balance for each image to be the same

  • be prepared for some movement, you cannot control what wildlife will go across in front whilst you're pushing the shutter.

Most digital cameras have an ability to produce very large quality pictures and therefore we can often produce the results we want just by sectioning the image rather than having to take something special.

Tools of the Garden Photographer

As well as your camera kit, there are other gadgets and devices you can use to help, some of these include:

Reflectors can be used to help control the amount of light on the subject. You can use them to redirect the light source into shadow areas or as a shade against too much sun.

Diffusers often like a Reflector or a centrepiece of a bottle top set, is a piece of material that can be put between the light source and the plant or other item that scatters and softens the light.

Light Tents can be used to control the amount of light or diffuse the light if the sun is too strong, but will also act as a good wind break in breezy conditions. Of course the light tent in use here would have to be those with no base, so that you can put it over the item you are trying to capture, and this may not be practical in public or private gardens as other plants around may get damaged. In your own garden however it is an option, and may be possible in others if you get permission first.

Clamps. Breeze and wind can be a problem when photographing outside so access to a clamp like the Wimberley Plamp can assist in restricting movement. As you can see from the photo this has a large clamp on one end which can be attached to a tripod leg or other solid structure, whilst the green clamp end has been made to be delicate enough to take items such as flower stems etc.

Or you could use a Novaflex Flower Stalk Holder, but this is more suited to indoor photography when you are in more control of your environment.


See Larger Image Wimberly Plamp

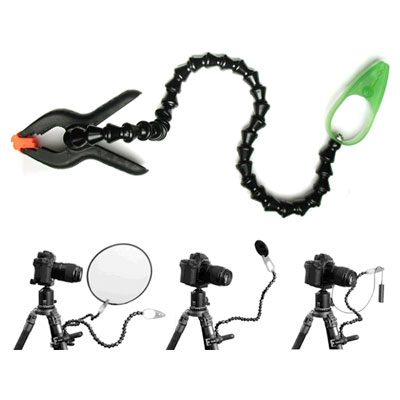
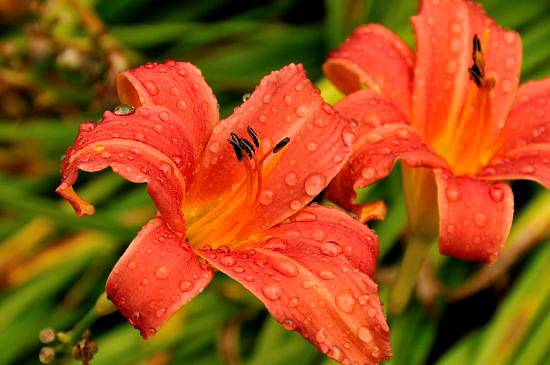
Flags to Block the Sun. Something like a Flarebuster. This is a simple, versatile, lightweight, flexible arm attachment for the camera that shades the lens from glare. It mounts directly onto most standard hot shoes, and is firmly attached to the camera with a-ring-tightening system, much like a flash unit. It is perfect for supporting a variety of attachments, in addition to the lens shade, such as vignettes, filters, props or special masks. It can be used with many accessories that you already own. The clamp on the other end allows for fast easy changing of masks and filters without threading or turning. It comes in kit form which includes a connecting screw for attaching it to the tripod hole on the camera, or on the tripod itself. The arm is flexible but firm, allowing for unlimited positioning combinations. It is also ideal for hard-to-shade zoom lenses. It folds easily and stores in any camera bag or pocket. Of course you could make up your own similar design to suit your needs.

Many garden photographers have a simple stick or tripod arrangement that holds some blocking device, this could be a bottle top set (often a diffuser with a reversible zip on jacket) that duplicates as a reflector set.

Water Spray. Water globules on flower heads or leaves can add a different dimension and focal point to an image. Also the water spray can add a sheen to something that may look a little dull in texture normally. Used wisely it can give a pleasing image. Garden centres and the like sell water sprayers for gardeners to give a light watering to their more delicate plants, so look out for one of these and have one at hand. Using water sprays has to be done with some caution as water globules on plants can act like lenses in bright sun and mark them.

Plant Labels. Plant labels are useful as it enables you to make a note of what you are photographing particularly when doing close up images that may be used in more technical publications. However they can also be a headache. Apart from the obvious of being unsightly in the shot, they are also usually white and this can give highlight problems. One tip is to try to position the label out of view or failing that have a brown or green serviette handy to position over it. Choose the correct colour to compliment the colour of the stem of the plant.

There are other skills mentioned in another of our articles, so take a look here for the other things to look out for.


See Also:


By: Tracey Park Section: Gardens Section Key:
Page Ref: gp_techniques Topic: Gardens Last Updated: 03/2011
.

This page:

Link directly to this page, with text or the button on right.

Text linking: Garden Photography Essential Techniques  on Photographers Resource

Linking Instructions                            http://www.photographers-resource.co.uk/

Photographers Resource, all the information for the photographer