Essential
Skills for Garden Photography
Garden photography uses a
vast number of photographic skills and below are listed some of those that you
may want to think about and take into consideration when approaching this task.
From composition through to how to get your vision onto the printed page each
takes a different skill to achieve it. Some of these include:
|
Composition
A garden
can be a small or large environment. It can be highly manicured and structured
or the other extreme of completely wild. Each has it's own appeal and
challenges, but most of all you need to consider how the final picture is going
to be portrayed. You also have the challenges of height and expanse, getting the
image to look right on the print will involve you in having to think about
foreground and background focal points as well as perspective. For more on
composing photographs in general and techniques like using mirrors to help why
not take a look at:
Perspective
Using
telephoto lenses and standing further back from your main focal point will allow
you to pull the background detail towards you and therefore close up the
distance, whereas if you use a wide angle lens and move closer to your main
subject this will give you a wider angle of view. Of course your position can
also have an effect on structures, buildings, statues, trees or other garden
features in that too close and looking up will cause the top to bend inwards so
moving yourself further back, if you can, may be more effective.
For
some ideas on how you might go about tackling perspective take a look at:
Exposure
With a
garden you have natural variable light to contend with. You can't switch on or
off the sun so you have to be aware of the amount of light and where it is
falling within your composition. When you are photographing a wide scene within
the garden, light is bouncing everywhere and controlling the exposure for both
the ground, which will be dark and the sky, bright, needs to be considered.
We have three built in meters
on our DSLR's allowing us a variety of metering techniques. We can also
adjust the exposure compensation to make the image darker or lighter. Some later
cameras also have active d-lighting that allows the contrast range to be
increased. With larger garden scenes so as not to loose the sky I will often
under expose by using a small - (minus) exposure compensation, as I know I can
pull detail out of the shadow areas in editing and it is not possible to recover lost
detail in highlights. Of course there are other techniques that can be used to
help control light, like fill flash and reflectors.
For more on exposure
techniques take a look at our
Exposure Section
 and in particular our
Article Route on Exposure.
and in particular our
Article Route on Exposure.

Fill Flash and Reflectors
Fill
flash is a good tool to help add additional light to the shadow areas of your
photo and is particularly useful when doing
close ups
of particular plants,
or trying to put detail onto a garden feature.
Reflectors
are another useful tool in this respect, in that you can use the
reflector to bounce back the light onto the side which is in shadow.
For
more on how you might go about using fill flash and reflectors, check out our
Lighting and
Reflectors Section.
Use of Polarizer's
Using a
polarizer
is
another way of controlling the amount of light, but more often used to reduce
the amount of polarized or scattered light. Polarizer's can help reduce haze,
make colours more pronounced and either enhance or reduce reflections, a useful
feature on ponds and water features. They can also have the effect of removing
sheen from grass and leaves, giving a more deeper colour. Views with blue sky and
white clouds are enhanced and the effect is most marked if the camera is at
right angles to the sun.
Depth of Field
To
control the effect that the background has on the main subject of your photo,
you can adjust the depth of field be enlarging or reducing the aperture of your
lens. You can widen the
Depth of Field
and therefore increase how much of
the photo is sharp (in focus) in front and behind the point you focus on. A
larger f number, a smaller hole, puts more in focus, while a smaller f number
makes the depth of field smaller and is useful for throwing the background out
of focus.
|

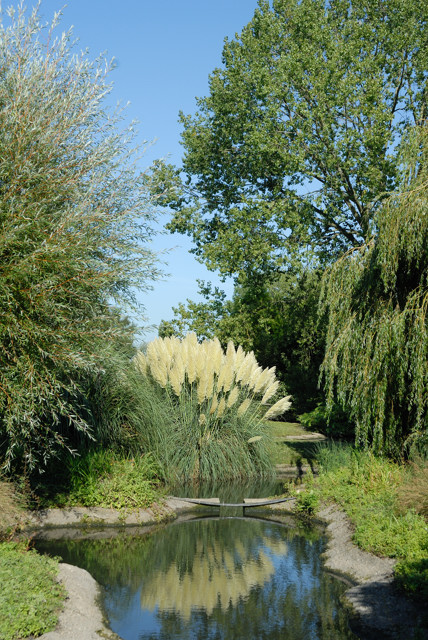
 Composition and Reflections

Draw the eye into the picture
Give it depth
A Focal Point
|
With a
wider angle lens the depth of field is much greater, while a telephoto lens has
a narrow depth of field. Generally the nearer you are, the narrow the depth of
field. For those photographers seriously involved in gardenscapes this will become a major feature and you need either a depth of
field calculator or one of our depth of field guides.
Controlling Movement
On most days in the UK you can still have an element of breeze which
can make the plants move. On wider garden shots this is unlikely to have a lot
of impact, as the
aperture
you will be using will compensate for this. However
for moving water features or when doing close-ups this is
something that will need consideration. Routinely movement can be controlled by
the speed which in turn is affected by the
ISO
and
apertures you select. The speed that is needed depends on how fast the object is
moving across the frame and relevant to the time it takes to get across.
Generally the closer you are the higher speed needed to stop the movement. In
the case of water features if you want to create a steam effect then you will
need a long exposure, the lower speed allows the shutter to remain open longer,
whereas a high speed will stop the movement and give an ice effect. Normal speed
will leave it looking more natural.
Instead of coping with the
movement we can decide to reduce the movement by using such items as bottomless
light tents or clamps to steady plants. See
Garden Photography
Essential Techniques
for more on these items.
Macro Photography
Macro Photography
is the art of getting closer to your subject. Perhaps it's a portrait of a
butterfly, getting in close to the middle of a plant, getting the stamens or the
tiny wildlife that live and work within it. We have a number of articles on
macro and
getting
closer to your subject,
including techniques involving the use of
Close-up Lenses,
macro lenses,
Extension Tubes or Bellows
and
stepping rings.
Time Lapse Techniques
Of
course plants particularly do not grow/open in one quick flash, it is achieved
over many days/hours depending on the type of plant. Using time lapse techniques
can allow you to take a number of sequenced images over a period to be able to
create a moving image of something we don't normally see with our own eyes.
Removing People
This
can be done in a number of ways. You can sit/hang around and wait for
everybody to get out of your shot, or of course choose a day when members of the
public will not be in such large numbers, or ask for your own private
viewing. The other way is to compose your shot so that if people are within it
you can remove them later in the digital darkroom using editing software like
Photoshop. A variation on this, and if you like using Photoshop is to take a
stack of pictures of the same scene and combine them into multi layers removing
from each layer the people you have in the shot and then when no more people are
in any of the pictures to flatten/combine them. To achieve this successfully you
need to have your camera on a tripod and use it in manual mode so that you can
lock the
Exposure
and
white balance.
Editing
In the age
of digital, editing is a natural part of the workflow process. Of course we all
strive to take that perfect image in camera, but it is not always possible as
outlined in some of the areas above. How much editing you do is down to what you
are trying to achieve with the final image. It might be that you only need to
pull detail out of shadows, adjust brightness/contrast, enhance colours a
fraction and sharpen a little, or you may need to do more like removing items,
stitching to make panoramas, or combining mutli-layers together to get the
correctly exposed image. Of course you may want to produce a limited edition
print and add text, or produce images for web use, whatever it is editing will
be a part of your image making process.
See Also:
|